Module Bundler Explained.
I always had a hard time in understanding the webpack concept. Since the all the automated packages out there in market you really don't even need to understand in the early stage of your career, but if you really want to understand how the things work under the hood Module Bundler is really important. If you want to create own package or anythings, the concept of bundling is really important. Hence, let's get started.
To build website you only need three things:
- HTML
- CSS
- Javascript
But nobody uses "only" just these three thing to make your own website. You might need some kind of css preprocessor like Scss, or you might replace html with library like Reactjs, then also you also need bunch of third party library so that you do not need to do everything from scratch.
It's nearly impossible to control everything with single js file. Even if you did manage to do that, that file size would be too massive that increases you load time and that we do not want.
Hence, Module Bundler comes into picture to solve these kinds of problem. It minimize the above problems. I will be explaining you one of the famous bundler known as Webpack. I highly recommend to visit their documentation to learn more.
Some other famous bunlder are Rollup, Parcel, and Snowpack.
Now let's explain what module bundler does.
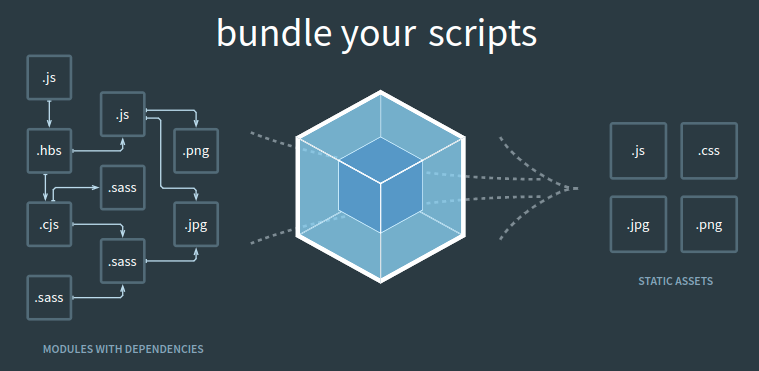
You see the image above? That's what bundler do. They bundle exery assets from your projects, whether it's js, html, css bundle them and make us a minified build of our project and we use that build folder, then deploy it to somewhere to use.
In simple words it takes multiple js file and combine them into single js file.
Dependency Graph :
Any time one file depends on another, webpack treats this as a dependency. So you code may have some dependency, and that dependancy may also have their own dependancy. Bundler like webpack keeps track of how to put everything together. But first we need to put where is our entry point then it will look at all our imports and dependancy and piece everything together.
Entry Point:
An entry point indicates which module webpack should use to start building out its internal dependency graph.
By default its value is ./src/index.js, but you can specify a different entry points by setting an entry property in the webpack configuration. For example:
webpack.config.js
module.exports = {
  entry: './something/something/index.js',
};
Output:
The output property tells webpack where to emit the bundles it creates and how to name these files. It defaults to ./dist/main.js for the main output file and to the ./dist folder for any other generated file.
webpack.config.js
const path = require('path');

module.exports = {
  entry: './something/something/index.js',
  output: {
    path: path.resolve(__dirname, 'dist'),
    filename: 'webpack.bundle.js',
  },
};
Now, I have a simple .js file. (I already imported that in .html file). I have simple program to remove spaces from the string.
import { removeSpace } from '../utility/removeSpace';

console.log(removeSpace('hello world'))
Now this will gives me error. Because browser don't know where to look that piece of code or that file.

Let's just write our first webpack configurations to solve this problem. Open empty folder and do the basic setup and run the command.
npm init -y
npm i ---save-dev webpack webpack-cli
Now, to run webpack we need a build command, will be adding it in package.json file.
{
  "name": "webpack",
  "version": "1.0.0",
  "description": "",
  "main": "index.js",
  "scripts": {
    "build": "webpack"
  },
  "keywords": [],
  "author": "",
  "license": "ISC",
  "devDependencies": {
    "webpack": "^5.88.2",
    "webpack-cli": "^5.1.4"
  }
}
After that we just need to run a command:
npm run build
If everything goes in right direction, you should see dist made by webpack.
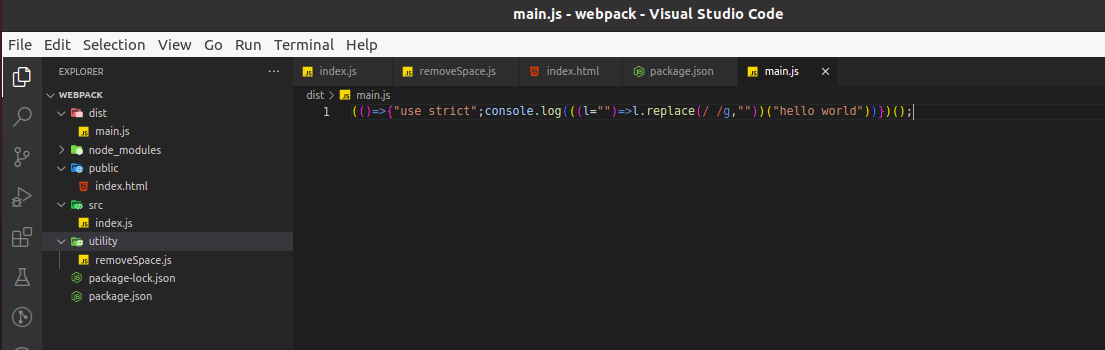
You can see the folder structure as well and also webpack squashed your all .js into one single file. We just need to connect that into our html file and then we are good to go.
If you don't see any error and your helloworld is printed in console then Congratulation! You just written your first webpack.
Note: Currently we using default webpack configurations, by default webpack looks into src/index.js file. If we want to change it, we need to make webpack.config.js file in root folder.
I already mentioned in entry point that you can specify the entry point filename.
Now let's make webpack.config.js file.
const path = require('path')

module.exports = {
  entry: './src/index.js',
  output: {
    path: path.resolve(__dirname, 'dist'),
    filename: 'something.js',
  },
};
If we specify the something in output file and then run a build command, you will notice that in dist folder there will be something.js file with same code.
And what's the website without any styling. Now let's add some sass which is basically a css preprocessor.
Make a new file in /src/style.scss
$red: red;

body {
  background: $red;
}
Now, let's try to import that into /src/index.js.
import { removeSpace } from '../utility/removeSpace';
import './style.scss'

console.log(removeSpace('hello world'))
If you try to run the build command. You will get a error.
ERROR in ./src/style.scss 3:5
Module parse failed: Unexpected token (3:5)
You may need an appropriate loader to handle this file type, currently no loaders are configured to process this file. See https://webpack.js.org/concepts#loaders
| $red: red;
|
> body {
|   background: $red;
| }
What is the loader exactly?
Loader
A loader is a way to pre-process a file that isn't javascript. In our case it's a .scss file.
Essentially loaders provide a way to handle any kind of file that's not plain javascript, loaders exist for pretty much every use case you can imagine including typescript markdown and various css preprocessors.
We are going to use css-loader, style-loader and sass-loader.
npm i --save-dev css-loader style-loader sass-loader
Now, we add module in config file and we can specify all our loader there, it takes test attribute and then simple regular expression to specify in which files we want to use that loader.
const path = require('path');

module.exports = {
  entry: './src/index.js',
  output: {
    path: path.resolve(__dirname, 'dist'),
    filename: 'something.js',
  },
  module: {
    rules: [
      {
        test: /\.scss$/,
        use: ['style-loader', 'css-loader', 'sass-loader'],
      },
    ],
  },
};
Now Run build command, if you check your something.js file, you will notice your .scss code in same file.
Loader will do pretty much anything. But there are somethings that loader cannot do. Hence, plugins comes into picture.
Plugins
Plugins are the backbone of webpack. Webpack itself is built on the same plugin system that you use in your webpack configuration!
They also serve the purpose of doing anything else that a loader cannot do. Webpack provides many such plugins out of the box.
Now if you want to analyse the bundle size? We can use something called bundle analyser to do that.
npm install --save-dev webpack-bundle-analyzer
Then make entry to config file.
const path = require('path');
const BundleAnalyzerPlugin = require('webpack-bundle-analyzer').BundleAnalyzerPlugin;

module.exports = {
  entry: './src/index.js',
  output: {
    path: path.resolve(__dirname, 'dist'),
    filename: 'something.js',
  },
  module: {
    rules: [
      {
        test: /\.scss$/,
        use: ['style-loader', 'css-loader', 'sass-loader'],
      },
    ],
  },
  plugins: [
    new BundleAnalyzerPlugin()
  ]
};
Now, Its annoying to run build command again and again, webpack also allow to make local development server.
npm i --save-dev webpack-dev-server
Config file
const path = require('path');
const BundleAnalyzerPlugin = require('webpack-bundle-analyzer').BundleAnalyzerPlugin;

module.exports = {
  entry: './src/index.js',
  output: {
    path: path.resolve(__dirname, 'dist'),
    filename: 'something.js',
  },
  module: {
    rules: [
      {
        test: /\.scss$/,
        use: ['style-loader', 'css-loader', 'sass-loader'],
      },
    ],
  },
  plugins: [
    new BundleAnalyzerPlugin()
  ],
  devServer: {
    static: {
      directory: path.join(__dirname, 'public'),
    },
    compress: true,
    port: 9000,
  },
};
We have to add serve command in package.json as well.
{
  "name": "webpack",
  "version": "1.0.0",
  "description": "",
  "main": "index.js",
  "scripts": {
    "build": "webpack",
    "dev": "webpack serve"
  },
  "keywords": [],
  "author": "",
  "license": "ISC",
  "devDependencies": {
    "css-loader": "^6.8.1",
    "sass-loader": "^13.3.2",
    "style-loader": "^3.3.3",
    "webpack": "^5.88.2",
    "webpack-bundle-analyzer": "^4.9.1",
    "webpack-cli": "^5.1.4",
    "webpack-dev-server": "^4.15.1"
  }
}
Now, run npm run dev this will watch src directory and trigger if we change anything in src it will re-compile our code.
I think that's enough to getting started in a webpack. Hopefully you like this blogs and it will be helpfull to you.
Thank You.
